The following is an excerpt from the chapter LaTeX Questions Answered in Pressbooks Guide: A reference for open textbook authors using Pressbooks by Arianna Cheveldave
An array is a LaTeX environment that aligns items in columns. An array can be used to align equations or to create a table of sorts. Here is an example of an array:

When you begin an array, you must specify how many columns it will have and how each will be aligned: left, centre, or right. You can have as many rows as you like and do not need to declare this number at the beginning. You also have the option of inserting vertical and horizontal lines into your array.
Say that you wanted to show in detail how to solve the following equation for z:

A good way to display all the steps would be to put this equation into an array.
Before you write the array, it is necessary to determine how many columns there will be. Including symbols and values, there are five distinct elements in this equation (4z, +, 5, =, 25), so there should be five columns.[1]
You start by writing the beginning of the array:

The \begin{array} command indicates the beginning of an array environment. The curly braces after this command hold the parameters for the array’s columns. These parameters are any combination of three letters: l (left-align), c (centre), and r (right-align). An array can have as few as one column. There doesn’t seem to be a limit on the number of columns possible in an array, but at around 25 or 30 columns, the array will no longer easily display on a page.
For this array, the column parameters are rrrrr, which creates five right-aligned columns. You may decide to shift things to the left or centre later, but you can start with everything right-aligned for simplicity.
Then, you insert the column dividers:

Since there will be five columns, there must be four column dividers, represented by ampersands. If you know ahead of time how many rows you need, it can be good practice to set up all your column dividers before you start inputting your values.
Now, insert the equation into your array:

Each character is ina different column, so everything will appear spaced out. Arrays are dynamic, meaning that they expand and change size to fit what they hold. If one column contained a larger expression, it would change the spacing in the array.
The last thing is to end the array:

The \begin and \end commands are used for most LaTeX environments.
Now, you have a complete array that will display like so:

Next, solve the equation. First, subtract 5 from both sides:

If you look at the plain source of this equation (by right-clicking and changing the Math Renderer setting to Plain Source), you’ll see that there is nothing in the first column of the second row. The first minus sign is in the second column, to align with the plus sign in the first row, and there is a 5 in the third column. The fourth column is empty, and the fifth column has a −5.
As you can see, it is not necessary to fill every spot in a row or column in an array: you can leave spots empty if you wish.
The other important thing to note is the \\ after the fifth column in the first row. This is the new-line command that is necessary before any new row in an array. You don’t need a new-line command at the end of the last line of your array. The new-line command can also be used outside of the LaTeX environment to insert a line break.
Now, add a horizontal line beneath the subtraction, using \hline:

The command \hline stands on its own and does not require a new-line command after it. For our purposes, we will not consider it to be a row.
Now show the result of the subtraction:

The 4z has moved from the first column to the third, so that it is in the rightmost position before the equals sign, which is in the fourth column.
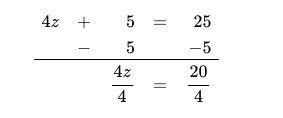
Now, divide each side of the equation by 4. Instead of adding a fourth row for that, you can turn the values in the third row into fractions:

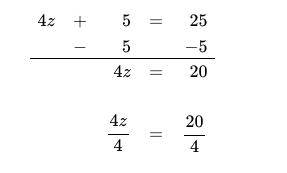
You can either choose to do it this way, or to leave space between the third row and a fourth row that will display the division. This would look like so:

Note that two new-line commands were inserted at the end of the third row. This inserts an empty row before the new line for the fourth row in order to improve readability.
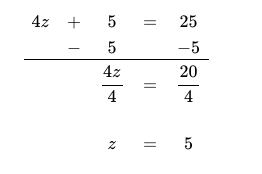
We will finish the version of the array that had fractions in the third row. The last thing to do is display the value of z:

Two new-line commands were inserted at the end of the third row because fractions are so tall that readability can be impeded if rows with fractions in them are left too close to others. Therefore, it is good practice to add two new-line commands at the end of any row containing fractions.
In this last iteration of the array, the alignment of the columns has shifted. The third row is now centred, so that the fraction on the left-hand side of the equation in the third row lines up with the values in the first and second rows more nicely. The fifth column is also centred for the same reason.
A final thing to know about arrays is that you can insert lines between columns, if you wanted to make a table of sorts. All you have to do is insert |vertical bars| between the column parameters at the beginning of the array.
For example, to achieve the following array, the column parameters were written as |c|c|l|, which put lines on either side of each column:
| Variable | Value | Example |
| a | 2 | 2a+4=8 |
| b | 5 | b−3=2 |
| c | 8 | 2c÷4=4 |
To only produce lines between columns and not on the outside of the array, you would write c|c|l.
However, it must be pointed out that tables can be created much more easily using the table button on the visual editor toolbar in Pressbooks. Tables created using HTML and the visual editor toolbar are also known to be accessible for screen-reader users.
Learn more:
- LaTeX Questions Answered: How Do I Cross Something Out?
- LaTeX Questions Answered: What Kind of Symbols Can I Write Using LaTeX?
- Depending on the complexity of what you’re trying to explain or show, it may be sufficient to just have three columns: one for each side of the equation and one for the equals sign. ↵
