By Melanie Latham, coordinator, educational technologies, Thompson Rivers University
It’s no surprise that digital course spaces, often in learning management systems, have become an essential extension of physical classrooms. By making course materials available online, students can engage with them anytime, anywhere, and at their own pace. This flexibility creates a more inclusive and accessible learning environment that accommodates diverse student needs. Also, a digital hub can be used to support your in-person teaching. For example, in the classroom you can pull up and refer to resources that exist in the digital course space to help build continuity between the online and physical environments for students.
However, the organization and structure of this environment matters. If students struggle to navigate their digital course space, the tools and materials meant to support their learning can become sources of frustration and disengagement. As Nilson and Goodson (2018) emphasize, well-structured online content empowers students by helping them grasp the big picture of their learning journey, manage their time effectively, and reduce anxiety about course expectations.
This post will explore four key areas that can transform your digital course space into an organized, intuitive environment that supports student success. These approaches draw on evidence-informed practices in online and blended teaching, as well as connect to the B.C. Post-Secondary Digital Literacy Framework. Whether you’re including materials online for the first time or revising existing online materials, these strategies will help you optimize your digital course space.
1. Course Menu: Build the Foundation
Once you’ve planned your course content, activities, and assessments considering constructive alignment, it is time to determine how to structure your digital course space. You can think of the course menu as the blueprint that provides students with structure and a big-picture view of what will be explored in the course. It’s important to consider how different organizational structures can support your pedagogical goals based on the needs of your students and context. Examples of course organization structures include:
- Weeks: This illustrates a sequential, weekly progression through the course (e.g., week 1, week 2, week 3, etc.)
- Topics: This illustrates a conceptual organization of the course through the topics that will be explored (e.g., topic A, topic B, topic C, etc.)
- Categories: This illustrates movement through the course based on types of tasks or activities (e.g., assessments, labs, lectures, etc.)
Once you determine the organizational structure that is most suitable for your context and course, the key is clarity and consistency in naming the sections. Three elements to consider are: sequence, topic, and time frame (Figure 1).
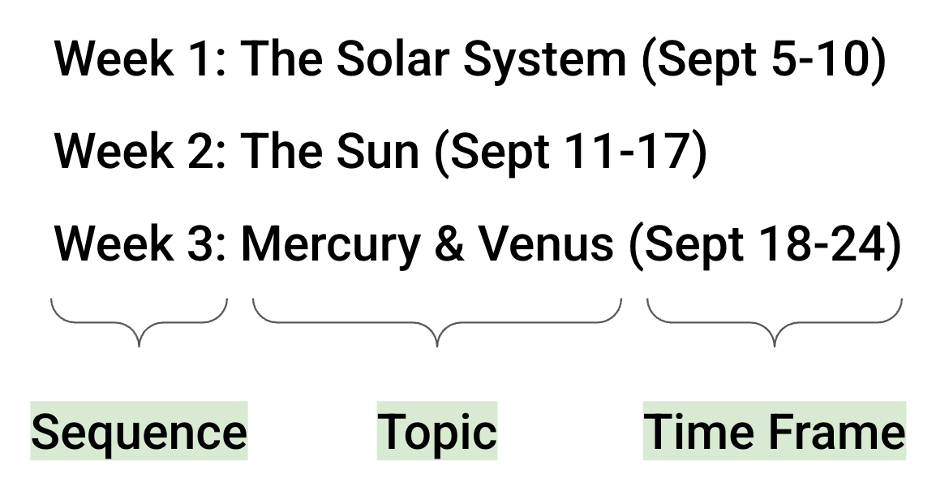
- Sequence: A sequence helps students see the progression and successive order in which they will be exploring course content (e.g., week 1, week 2, week 3, etc.). However, if used on its own, it conveys nothing about what is being covered in that section or when (the exact dates).
- Topic: A topic helps students identify what is being covered in that section. However, if used on its own, it conveys nothing about when that topic is being explored or in what order.
- Time frame: A time frame helps students see when they are exploring the course content, which is helpful since students can simply look at a calendar, identify exactly where they are in the course, and plan their time accordingly (Nilson & Goodson, 2018). However, if used on its own, it conveys nothing about what is being covered in that section.
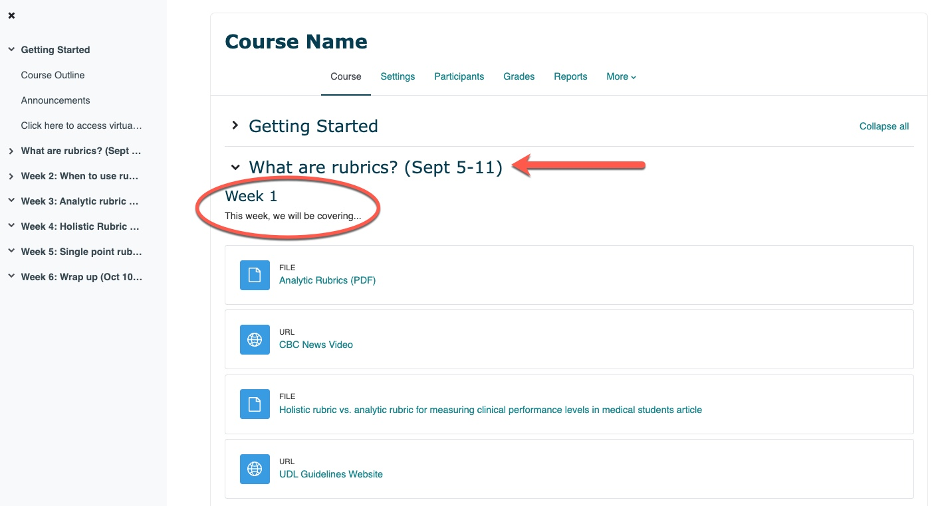
Why are these elements important? According to Weinschenk (2020), it’s easier for humans to recognize information than it is to recall it from memory. By structuring your course menu to provide multiple ways for students to recognize what is learned and when, it will help them find what they are looking for more quickly and effectively. However, if all three elements don’t fit in the title, the outstanding elements can be included at the beginning of each individual section to support navigation (Figure 2).
2. Home Page: Make a Strong Impression
The first thing students land on when they enter your digital course space is the home page. Think of the home page as your digital classroom door—it should be welcoming and clearly highlight what students can expect in the course to help them transition between the classroom and the digital course space. This way, when they leave your classroom and turn to their course space, they can clearly see and feel that you have thought about their online experience and have provided them with all the information they need to be successful.
Examples (not exhaustive) of elements to include on your course home page are:
- A warm welcome message or video introducing yourself and the course to help set a positive tone
- A course outline that is easy to access
- A land acknowledgement to share who you are, where you come from, the relationship to the land you reside on, and your intentions (Butterfield & Welsh, n.d.)
- Your communication plan so students know how to expect messages from you and where they can find these announcements
- A link to a virtual classroom that includes a description of when this virtual space may be used (e.g., office hours, occasional online sessions, etc.)
- Links to helpful student support services that are available at your institution
Together, these kinds of elements feature key course information and expectations in a place that is easy for students to navigate throughout the term.
3. Content Organization: The Art of Digital Curation
Gonzalez (2018) offers an interesting question to ponder when uploading content to your digital course space: are you a curator or a dumper? A curator thoughtfully selects and organizes resources to enhance learning, whereas a dumper is less mindful about the resources being included, how they’re organized, and how they impact the overall learning experience.
Since the mind has limited capacity to hold information in working memory when it’s processing content, it’s critical to organize information in an efficient way to optimize mental processing (Nilson & Goodson, 2018).
The following four practices are helpful to consider when curating materials for your digital course space:
(a) Thoughtfully select and filter the materials
When deciding what to include in your digital course space, it’s important to be intentional and ensure everything has a direct tie to your learning outcomes. MacDonald (2020) shares a helpful way to think about this by considering whether the resource is ‘need to know’ (something that ties directly to the learning outcomes that students will be assessed on) or ‘nice to know’ (an additional resource that is interesting and related, but students won’t be assessed on it).
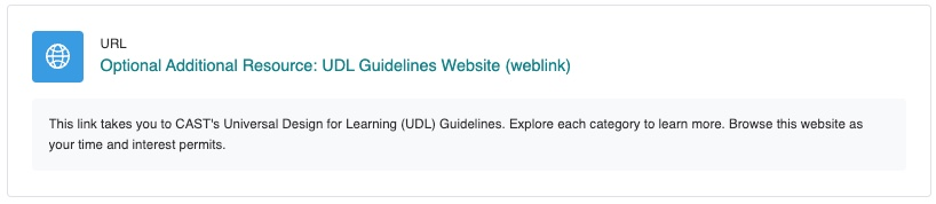
‘Need to know’ resources form your required course materials and ‘nice to know’ resources form your optional course materials. Be sure to clearly label ‘nice to know’ resources as optional (Figure 3) since they have the potential to distract from the learning outcomes and interfere with student time management.
(b) Group related content together
According to Nilson and Goodson (2018), students learn new material better and can remember it longer when it’s organized and chunked into categories or logical groups. This is further strengthened by placing the materials in the order students should review them.
For example, within each week or section of your course, place required resources first and follow them with an additional resources section that contains optional resources and clearly state that students can explore them when their time and interest permits. Or, if you have consistent sub-sections in each week, create headings to add additional organization and structure (e.g., Tuesday’s class, Thursday’s class). Grouping related content will help students prioritize and manage their time effectively.
(c) Name the resources clearly and consistently
To help students efficiently navigate the online resources, create a clear labelling system for resource names and use it consistently across your course and when adding new resources.
For example, Figure 4 depicts a resource name that describes the:
- Type of resource (e.g., lecture slides, video, article, etc.)
- Topic/title of the resource
- File type (e.g., PDF, PPTX, DOCX, etc.)
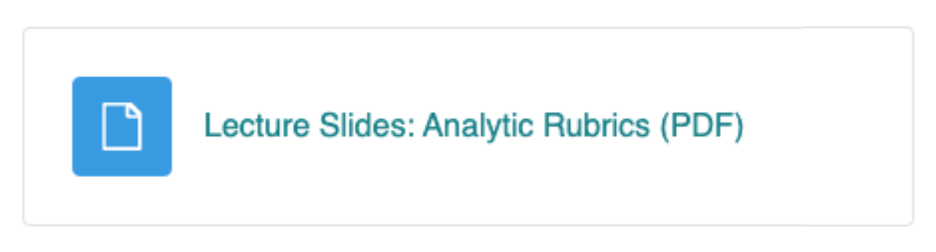
Students can use the information in the title to consistently identify and locate resources across sections in the digital course space with ease. Otherwise, if resources are non-descriptive, inconsistently named, or vary from section to section, students may have trouble determining what kind of resource it is, what it’s about, and how it might open on their device. This can be disruptive to the learning process.
(d) Add contextual framing for key resources
In the physical classroom, you likely wouldn’t hand students an article without explaining its relevance so this premise should be applied in the digital course space too. Where relevant, briefly introduce the resource and add additional context to help focus student attention (Figure 5). You may include things like:
- What the resource is about
- What parts of the resource students should focus on
- Why the resource is important
- How students should move through the resource
- How the resource connects to the learning outcomes

4. Assessment Descriptions: Building Clear Pathways to Success
Whether assessments occur in your physical classroom or are submitted online, students often begin working on them outside of class hours. This means including clear assessment information in the digital course space is crucial to support this independent learning. For example, depending on your course structure, this information may reside in an assessment section or within weekly content where students submit their work. Regardless, it should be placed in a logical location that is easily accessible at the time of need.
Key considerations for assessment descriptions are:
(a) Consistent and informative assessment names
Just like with course resources, described earlier, purposefully naming your assessments and using that naming convention consistently (inside and outside of the classroom) will support efficient navigation.
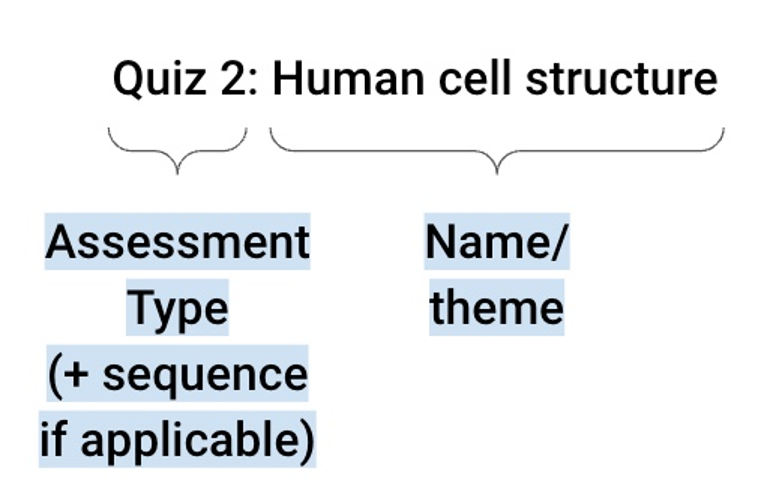
For example, Figure 6 illustrates an assessment name that includes the:
- Type of assessment (e.g., essay, quiz, presentation)
- Sequence, if applicable (e.g., quiz 1, quiz 2)
- Name or theme that describes the assessment
(b) Comprehensive and clear assessment instructions:
Once you’ve determined a naming convention, be sure to make the assessment criteria explicit and specific (Nilson & Goodson, 2018). This allows students to spend their time and effort on completing the assessment rather than searching for the expectations.
Some key assessment details to provide students with include:
- Clear purpose of the assessment and how it connects to the learning outcomes
- Step-by-step instructions using numbered lists or bullet points
- Grading details such as the marks it’s out of and how it’s weighted in the overall course
- Clear headings to chunk the assessment information (e.g., instructions, grading criteria, submission instructions, etc.)
- Marking criteria (e.g., rubrics, performance criteria, checklists, etc.)
- Due date
- Instructions on how they should submit their work
- If it’s a quiz, what kinds of questions they can expect (e.g., 15 multiple choice questions, two short answer, etc.)
Figure 7 shows an example of how some of these key details might look in practice.
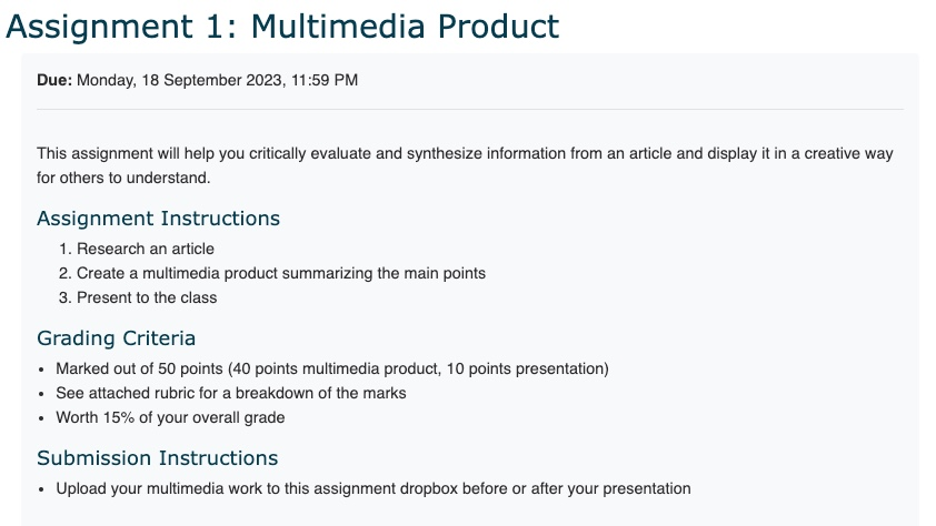
Students can scan the assessment details in Figure 7 with ease and understand the expectations much quicker than if the information was spread across multiple sections in the course or presented as paragraphs of information.
Moving Forward
As an extension of your physical classroom, it is critical to create a digital course space that is organized, accessible, and easy for students to navigate. By implementing the practices outlined above, you’re improving how students interact with your course materials as well as building essential digital literacy skills. These skills include curating digital materials that are specific to your students’ needs, mindfully selecting technology that considers students’ cognitive loads, and providing students with clear instructions and support to utilize technologies effectively.
Begin with taking small, manageable steps toward optimizing your digital course space. For example, start with one area, such as renaming the course menu items or restructuring the home page, and build from there. Implementing organizational changes over time will make a big impact on the overall student experience.
References
Butterfield, F., & Welsh, A. (n.d.). How Do I Get Started? Creating Safer Learning Environments for Indigenous Students in STEM at UBC. BCcampus.
Gonzalez, J. (2018, February 4). Are You a Curator or a Dumper?. Cult of Pedagogy.
MacDonald, J. (2020, April 23). How to Decide What is Need to Know and What is Nice to Know for your Learners. Medium.
Nilson, L. B., & Goodson, L. A. (2018). Online Teaching at its Best: Merging Instructional Design with Teaching and Learning Research. Jossey-Bass.
Weinschenk, S. M. (2020). 100 Things Every Designer Needs to Know About People (2nd ed.). Peachpit Press.